Bathroom Lighting Design: Layers, Fixtures, and What to Avoid
Bathroom lighting is one of the most underplanned elements in a renovation. Homeowners spend carefully on tile and fixtures, then accept a single overhead pot light or a builder-grade bar light above the mirror without much thought. The result is a bathroom that functions adequately but looks flat and often makes grooming genuinely difficult.
Good bathroom lighting serves two purposes that pull in different directions: it needs to illuminate the room overall and it needs to light the face specifically. Getting both right requires separate fixtures doing separate jobs.
The Three Layers of Bathroom Lighting
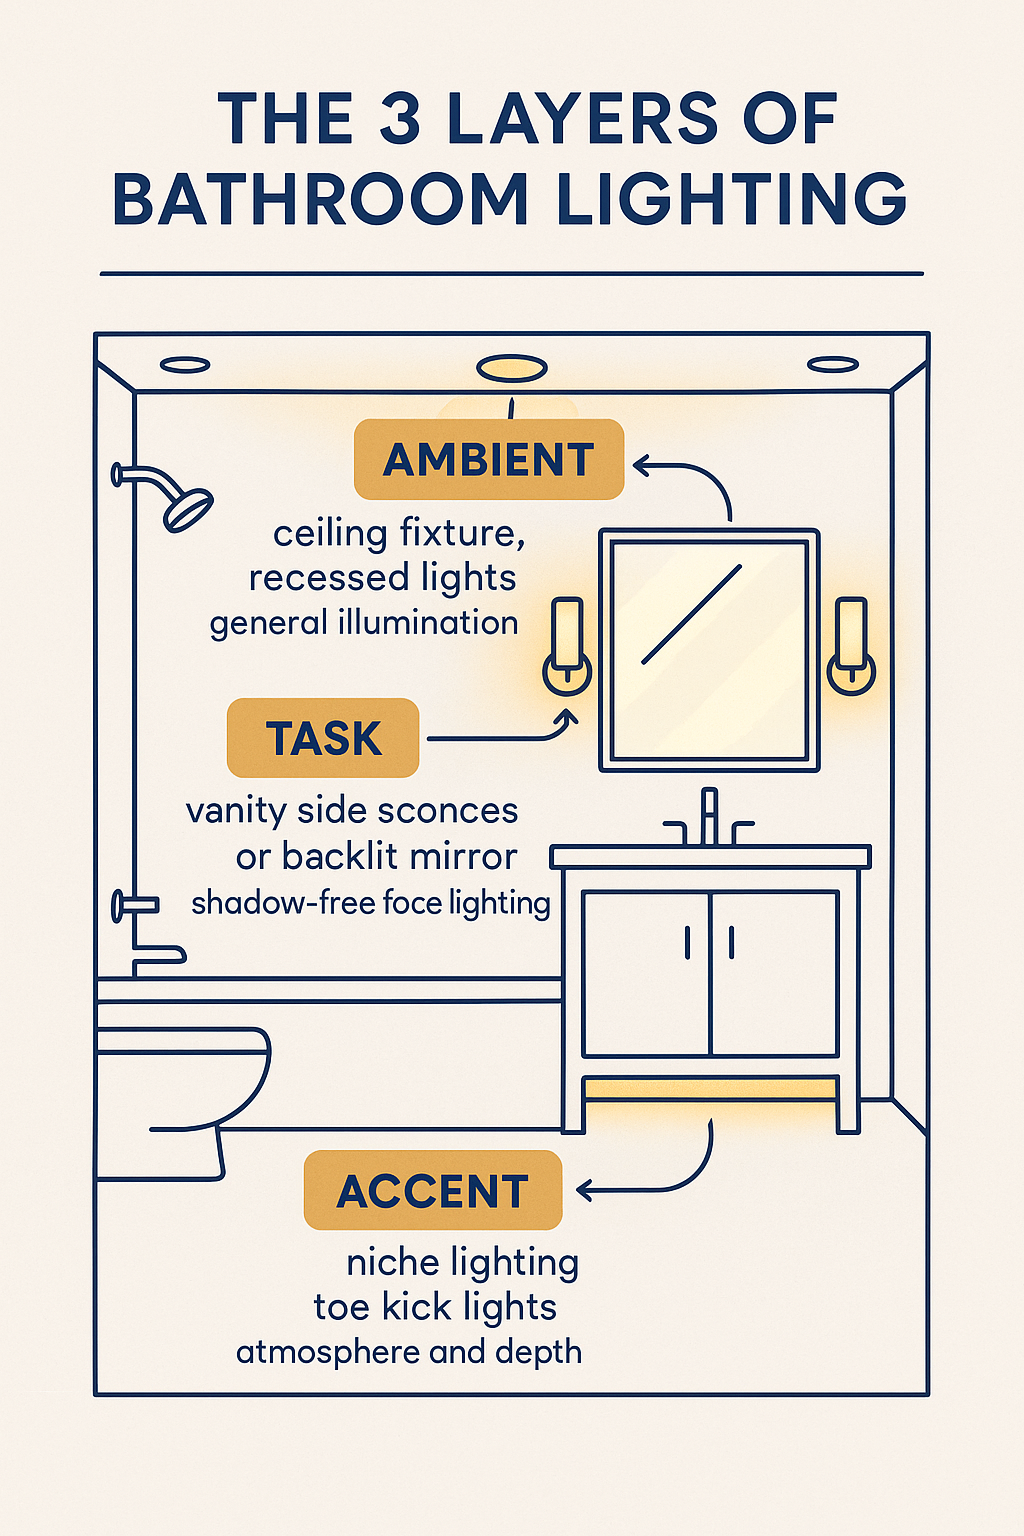
Professional bathroom designers work with three lighting layers. Using all three produces a room that is functional, comfortable, and visually complete.
1. Ambient Lighting
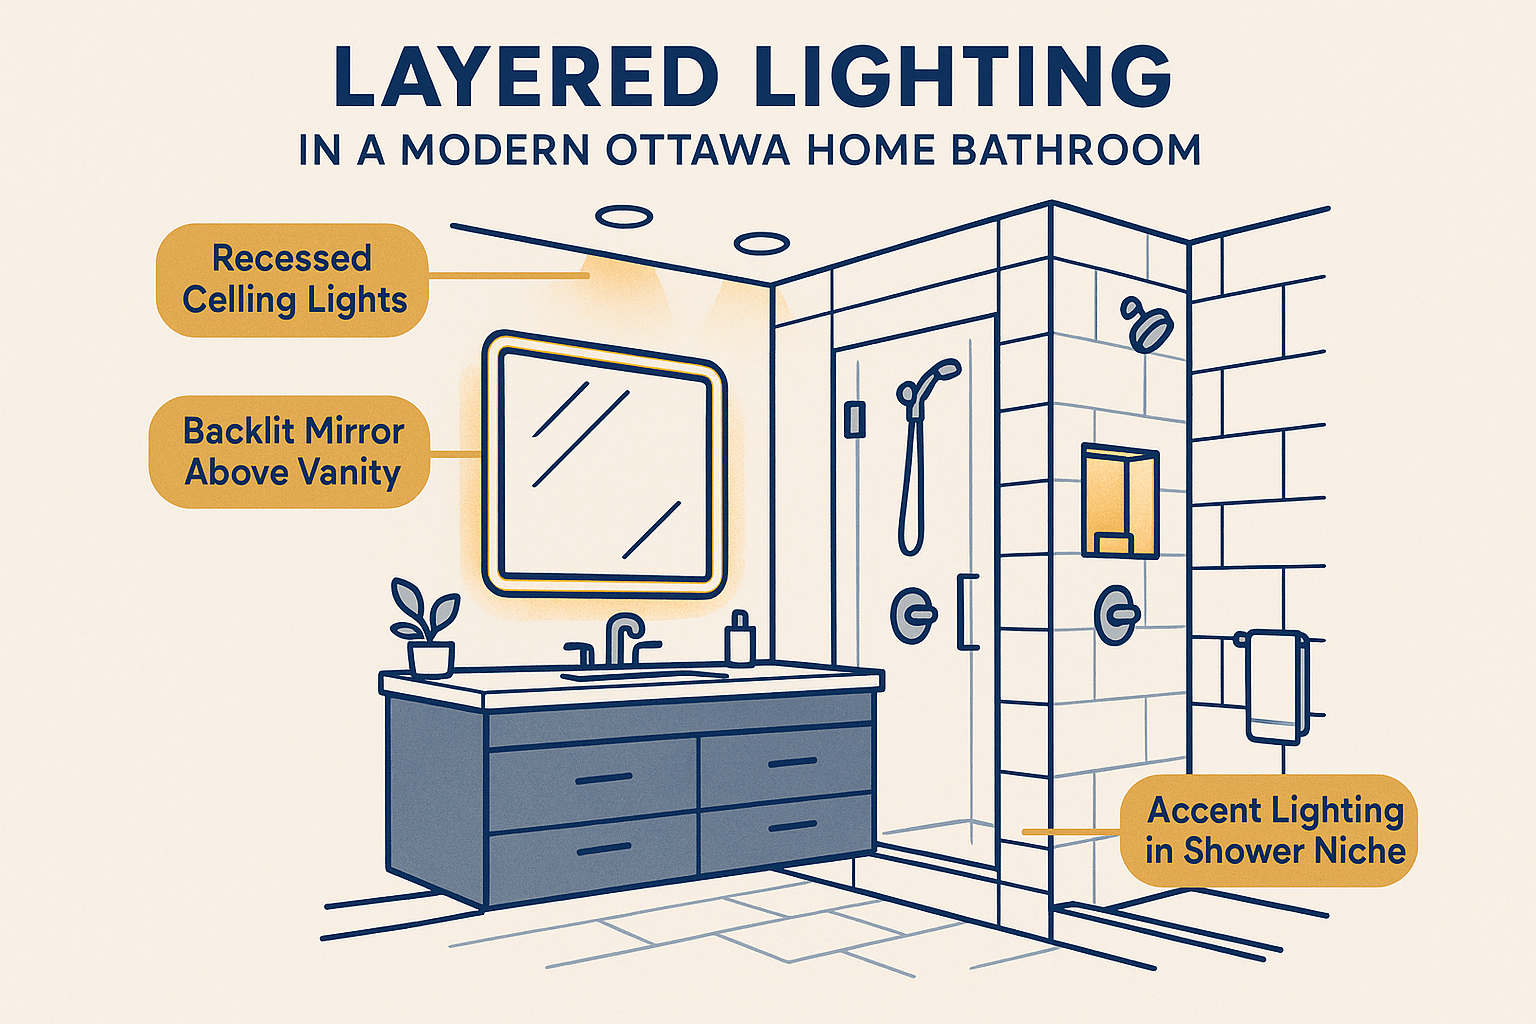
Ambient light is the overall illumination of the room. In a bathroom, this is typically a ceiling-mounted fixture — recessed pot lights, a flush-mount fixture, or a surface-mounted panel light.
Ambient light handles general visibility but it does not handle face-level task illumination. A single ambient source above casts shadows downward from the brow, nose, and chin — exactly the shadows that make grooming unreliable. Ambient light needs to be supplemented.
For ambient lighting in a bathroom:
– Recessed pot lights on a dimmer are the most versatile choice
– Space them to avoid uneven pools of light
– Use a colour temperature of 2,700–3,000K (warm white) for a comfortable bathroom environment
2. Task Lighting
Task lighting addresses the face directly. It belongs at or near the mirror, at face height, not above it.
The most effective task lighting positions light sources on both sides of the mirror at approximately 150–165 cm from the floor — at eye level for most adults. This eliminates the downward shadow problem and provides even illumination across both sides of the face.
Options for task lighting:
– Side-mounted wall sconces, one on each side of the mirror. This is the most effective single change you can make to bathroom lighting.
– Horizontal vanity bar mounted above the mirror — acceptable but less effective than side mounting because it still creates downward shadows.
– Integrated mirror or medicine cabinet with built-in lighting — backlit mirrors or lighted mirrors are a practical combined solution that provides edge-distributed light without requiring separate fixture placement.
Task lighting should be on a separate switch from ambient lighting so you can use one without the other.
3. Accent and Decorative Lighting
Accent lighting is optional but adds significant visual quality when used well. It includes:
– Under-vanity LED strips that create a floating effect for a wall-mounted vanity
– Recessed lighting inside a niche or above a freestanding tub
– Pendant lights flanking a mirror in a large ensuite
Accent lighting does not need to be on the same circuit as task or ambient. A dedicated switch or dimmer for accent lights allows dramatic evening lighting separate from the bright task lighting needed for morning grooming.
Vanity Lighting: The Most Important Decision
Vanity lighting is the element most homeowners get wrong. The most common mistake is mounting a single fixture — usually a 3-bulb or 4-bulb bar — directly above the mirror.
The issue with this placement: light comes from above and creates shadows directly on the face. The closer the fixture is to directly overhead, the worse the shadow problem. A bar light mounted high above a wide mirror provides essentially no useful face illumination for a person standing at the vanity.
The alternative — side sconces at face height, or a lighted mirror with integrated edge lighting — provides the face illumination that makes grooming reliable. Side sconces should be mounted at 150–165 cm from the floor and positioned so the shade or diffuser is roughly at eye level.
In bathrooms with a wide mirror that extends to the edge of the vanity, side sconces flanking the mirror rather than mounted above it provide the most even face lighting possible.
Colour Temperature and CRI
Two technical specifications matter more than most homeowners realize when choosing bathroom lighting.
Colour temperature is measured in Kelvin (K):
– 2,700K: warm white, similar to incandescent. Comfortable and flattering. Good for general bathroom ambiance.
– 3,000K: warm-neutral white. A good compromise for both task and ambient use.
– 4,000K: neutral white. Better for applying makeup accurately. Can feel clinical.
For most bathrooms, 2,700–3,000K for ambient and 3,000K for task lighting is the right balance. If the bathroom is used for detailed makeup application, 3,000–3,500K for task lighting provides more accurate colour rendering without feeling harsh.
Colour rendering index (CRI) measures how accurately a light source renders colours relative to natural daylight. A CRI of 90 or above is the professional standard for bathroom task lighting. At CRI 80 and below, colours in the bathroom — including skin tone, makeup, and clothing — shift in ways that are not apparent until you are somewhere with better light.
Choosing a fixture with CRI 90+ for task lighting is a detail that costs nothing extra but makes a meaningful difference in daily use.
Moisture Zones and IP Ratings
Bathrooms are regulated environments for electrical installation. Canadian electrical code (and Ontario’s Electrical Safety Code) divides bathrooms into zones based on proximity to water:
- Zone 0: Inside the bathtub or shower basin. Only 12V SELV (Safety Extra Low Voltage) fixtures permitted.
- Zone 1: Above the tub or shower to a height of 2.25 m. IP45 minimum rating required.
- Zone 2: 60 cm outside the tub or shower, and outside Zone 1. IP44 minimum rating required.
- Outside zones: Standard fixtures permitted.
Most homeowners do not select recessed shower fixtures for general bathroom use, but the zone requirements explain why specific fixtures are required inside and directly above a shower. Using a fixture with insufficient IP rating in a wet zone is a code violation and a safety risk.
For shower-specific lighting decisions, our tub-to-shower conversion page covers what is involved in a proper shower installation, including electrical requirements. For a full bathroom renovation in Ottawa, our team handles lighting planning as part of the complete project.
What to Avoid
Single overhead light only. A single pot light or flush-mount fixture is not sufficient for a bathroom used for grooming. Add task lighting at the vanity.
Overly cool colour temperature. A 5,000K or 6,500K “daylight” fixture feels like a locker room in a bathroom designed for relaxation. Reserve cool white for kitchens and workshops.
Fixtures without dimmers. Bathroom lighting at full intensity first thing in the morning or late at night is uncomfortable. A dimmer on the ambient circuit and ideally the task circuit as well allows you to match lighting intensity to use.
Mismatched finishes. Fixture finish should match or complement other hardware in the room. A chrome faucet with a brushed brass light fixture and matte black towel bars reads as incomplete. Choose a finish direction and apply it consistently.
Ignoring the exhaust fan location. A combined exhaust fan and light fixture over the toilet or in the centre of the room — common in builder bathrooms — places both functions in the wrong location. The fan should be over the shower or tub wet zone; the light should be where the light is needed.
For authoritative reference on bathroom lighting design, the Illuminating Engineering Society (IES) publishes residential lighting recommendations, and Energy Star Canada provides guidance on energy-efficient fixture selection.
Frequently Asked Questions
Where should vanity lights be positioned for the best results?
The most effective position is flanking the mirror at eye level — approximately 150–165 cm from the floor on each side. This eliminates downward shadows on the face. A single bar light above the mirror is the second-best option, but it produces shadows that make detailed grooming less accurate.
What colour temperature is best for bathroom lighting?
For general ambient lighting, 2,700–3,000K (warm white) is comfortable for daily use. For task lighting at the vanity, 3,000–3,500K provides slightly more accurate colour rendering. Avoid anything above 4,000K unless the bathroom is used primarily for professional makeup application.
Do I need separate switches for bathroom lighting layers?
Separating the ambient and task lighting onto different switches gives you useful control: bright task lighting when needed, ambient-only for evening use. Running everything on a single switch works but eliminates flexibility. Dimmers on both circuits add another level of control.
What is the IP rating requirement for shower lighting?
Fixtures inside the shower or bathtub basin (Zone 0) require 12V SELV fixtures. Fixtures above the shower up to 2.25 m (Zone 1) require a minimum IP45 rating. Fixtures within 60 cm outside the shower (Zone 2) require a minimum IP44 rating. Standard bathroom fixtures without an IP rating should not be used inside these zones.