How to Waterproof a Shower: What Goes Behind the Tile
Everything you see in a finished shower — the tile, the grout, the glass, the fixtures — is the visible layer. What makes that visible layer last 15–20 years without failure is a waterproofing system that you will never see once the installation is complete.
Waterproofing failures are the root cause of the most expensive bathroom repair scenarios: mould behind shower walls, rotted framing and substrate, structural damage to floors below upper-level bathrooms, and complete shower rebuild requirements. All of these are preventable when waterproofing is done correctly at installation.
Why Shower Tile Is Not the Waterproofing
A common misunderstanding is that the tile itself waterproofs the shower. It does not.
Porcelain tile is essentially water-impermeable. But the grout joints between tiles are not. Cement-based grout is porous. Over time — or immediately in a newly installed shower — water penetrates through grout joints and reaches the substrate behind the tile.
The tile and grout assembly is the finished surface. The waterproofing membrane behind it is what keeps water out of the wall and floor structure. If the membrane is absent, improperly installed, or fails, water reaches the wall framing, subfloor, and eventually the structure — regardless of how well the tile was installed.
What a Complete Shower Waterproofing System Involves
A properly waterproofed shower is a system of compatible components, not a single material.
The Substrate
The base layer under the tile must be a water-resistant or waterproof substrate. In a shower, this means cement board (e.g., Durock, Hardiebacker) or a polymer foam-based backer board (e.g., Schluter Kerdi-Board, Wedi board).
Standard drywall is not an acceptable shower substrate. Even moisture-resistant “green board” drywall is not waterproof and will deteriorate with prolonged moisture exposure. Standard drywall behind shower tile is a documented failure mode that leads to mould and substrate replacement.
Cement board is the conventional substrate. It does not rot or deteriorate with moisture, but it is not itself waterproof — water passes through it. It requires a waterproofing membrane applied over it.
Polymer foam board products (Schluter Kerdi-Board, Wedi) are waterproof by themselves in addition to being dimensionally stable substrates. These products simplify the waterproofing system and have become the preferred choice in quality installations.
The Waterproofing Membrane
The waterproofing membrane is the primary barrier against water infiltration. It is installed over the substrate, bonded to it, and carries water that penetrates the grout joints back to the drain rather than into the wall.
Sheet membranes — polyethylene or CPE (chlorinated polyethylene) sheets bonded to the substrate with thinset. These require careful overlap and sealing at corners and penetrations. When properly installed, they are highly effective. Installation requires more skill to ensure complete coverage and correct corner treatment.
Liquid-applied membranes — polymer or fabric-reinforced liquid coatings rolled or brushed over the substrate. These cure to form a flexible, seamless waterproof layer. The most popular in residential renovation because they are forgiving at corners and penetrations. Examples: Laticrete Hydro Ban, Mapei AquaDefense, RedGard.
Bonded waterproofing membranes (fabric + liquid) — a fibre mesh fabric set into a liquid membrane for reinforcement at seams and corners. TCNA (Tile Council of North America) guidelines and most quality contractors use fabric reinforcement at all inside corners and seams as a minimum standard.
Foam panel systems (Schluter Kerdi, Wedi) — the substrate and waterproofing function are combined. Panels are bonded with appropriate thinset and covered at joints and transitions with the manufacturer’s membrane fabric and thinset.
Critical Waterproofing Locations
The most common waterproofing failures occur at the same locations: inside corners, the floor-to-wall transition, and around penetrations. These are the areas where:
- Sheet membranes overlap and are most vulnerable to gaps
- Liquid membranes are most commonly applied too thin or missed entirely
- Movement between surfaces (floor/wall) causes cracking in rigid membranes
Inside corners: Should be reinforced with fabric tape embedded in liquid membrane, applied at a minimum 25 cm up each wall and 25 cm across the floor from the corner.
Floor-to-wall transition: The most critical joint in the shower. The floor moves independently from the walls — grout in this joint will crack. This joint should be caulked with a flexible sealant rather than grouted, and the waterproofing membrane must fully bridge it.
Drain connection: The drain must be integrated with the waterproofing membrane. Modern shower drain systems (Schluter KERDI-DRAIN, Wedi, Laticrete Hydro Ban drain) are designed to bond directly to the waterproofing layer, creating a continuous barrier from the drain flange to the walls.
Pipe penetrations: Every supply and drain pipe that penetrates the shower floor or wall must be sealed at the penetration. Waterproofing membrane must be applied continuously up to and around each pipe, sealed with appropriate sealant.
The Pre-Tile Test
A properly waterproofed shower should be flood-tested before tile installation begins. This involves plugging the drain, filling the shower floor with water, and allowing it to sit for 24 hours with no visible seepage.
If water leaks through the floor or walls during this test, the waterproofing has a failure point that must be found and corrected before tile covers it. After tile is installed, finding and fixing a waterproofing failure requires full demolition of the tile work.
A flood test before tile is the quality control step that prevents expensive post-installation discoveries.
What Shower Waterproofing Should Cost
In a standard shower renovation, waterproofing is a modest cost relative to the overall project:
- Liquid membrane materials (Hydro Ban, RedGard): $60–$150 for a standard shower
- Fabric reinforcement tape: $15–$30
- Labour to apply: $200–$400 (included in tile installation quote from most contractors)
- Schluter/Wedi system: $300–$700 for materials in a standard shower
The cost of a waterproofing failure — mould remediation, substrate replacement, full tile re-do — typically runs $3,000–$10,000+. Waterproofing is not an area to economize.
Recognizing Inadequate Waterproofing
When reviewing a contractor’s scope or an in-progress installation, the following indicate inadequate waterproofing:
- No mention of waterproofing membrane in the project scope
- Standard drywall used as shower substrate
- No flood test before tile installation
- A quote significantly below comparable quotes without a clear explanation — cut-rate shower work frequently skips or shortcuts waterproofing
For our tub-to-shower conversion projects and full bathroom renovations in Ottawa, our installations include proper substrate, liquid-applied membrane with fabric reinforcement at corners, and a pre-tile flood test as standard practice.
For technical waterproofing standards, the Tile Council of North America TCNA Handbook and product technical data sheets from Laticrete and Schluter Systems provide the authoritative installation guidance used by professional tile setters.
Frequently Asked Questions
What is behind the tile in a properly waterproofed shower?
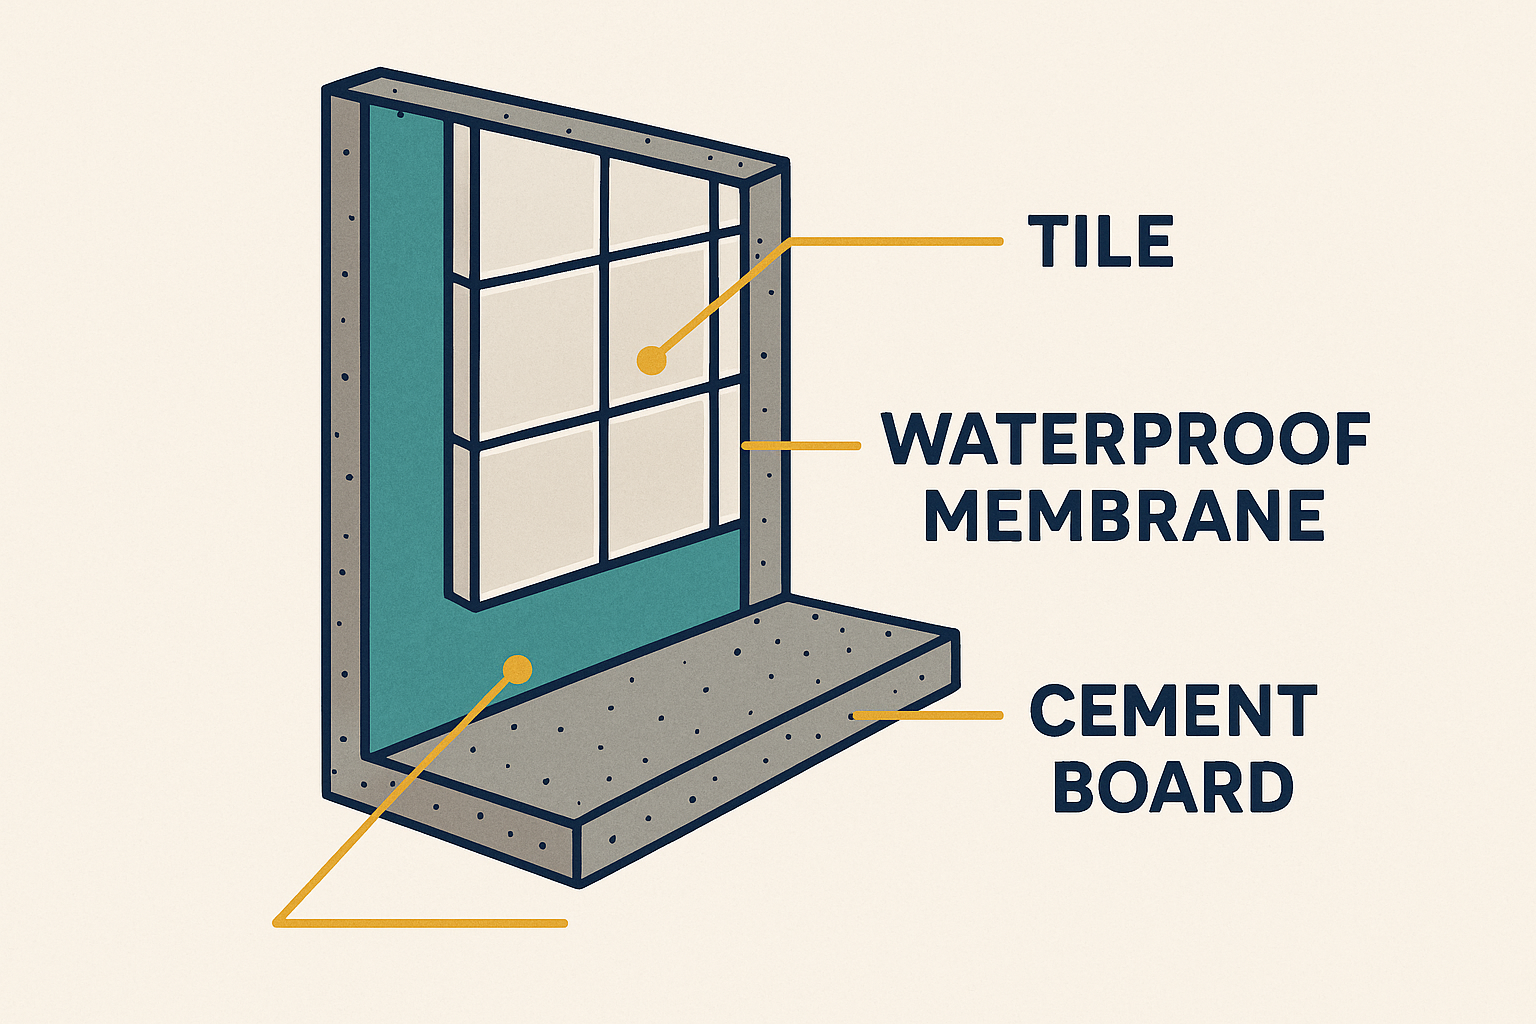
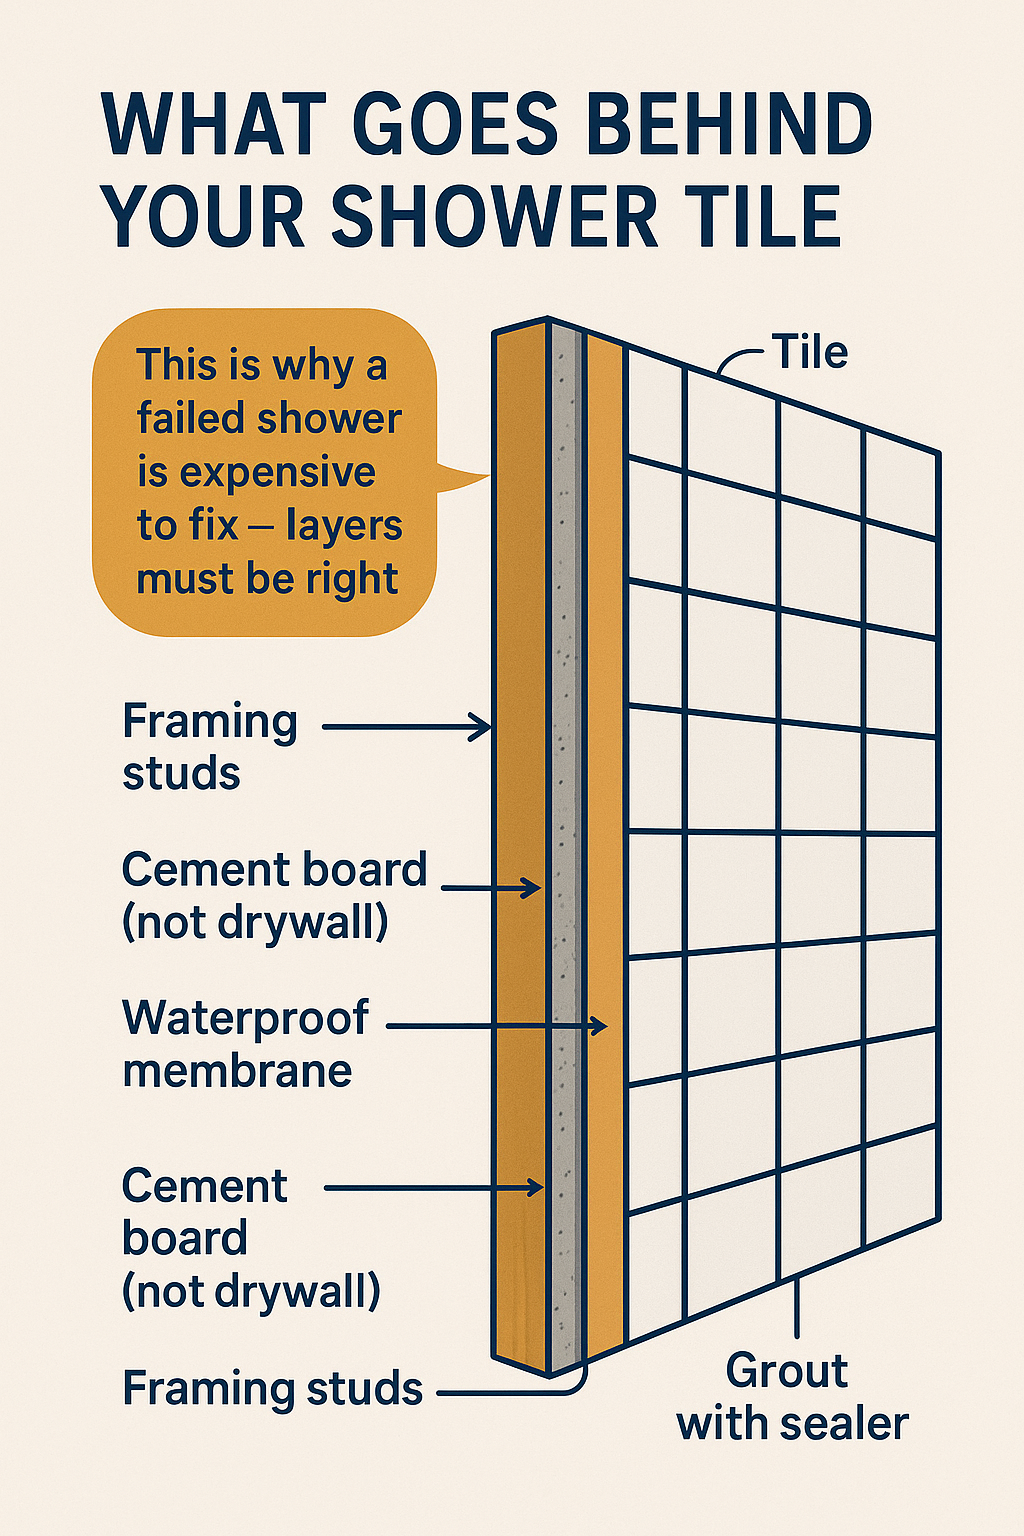
From the framing outward: framing/studs, cement board or polymer foam substrate, waterproofing membrane (liquid-applied or sheet), tile thinset, and tile. Each layer serves a specific function. The waterproofing membrane is the critical barrier that keeps water from reaching the framing.
How do I know if my existing shower is properly waterproofed?
If your shower is more than 10–15 years old, was built by a handyman rather than a professional, or shows signs of moisture on the wall outside the shower, it may not have been waterproofed adequately. The only way to confirm is to open the shower wall — typically done at full renovation time.
Can I tile over an existing shower without redoing waterproofing?
Tiling over an existing shower without removing old tile and refreshing the waterproofing is possible but is a significant risk. If the existing waterproofing is failing, the new tile will not be protected. In most professional renovation contexts, tile-over-tile is not recommended for showers — full demolition down to the substrate and a fresh waterproofing system is the right approach.
What is the difference between waterproofing a shower and sealing tile?
Waterproofing refers to the membrane system behind the tile that prevents water from entering the wall and floor structure. Sealing tile and grout is an application on the surface of the installed tile that reduces staining and surface water penetration. Both are important, but waterproofing is the structural protection; sealing is surface maintenance.