Adding a Basement Bathroom: What the Rough-In Process Involves
Adding a bathroom to an unfinished basement is one of the most value-adding renovations for Ottawa homes — it increases functional living space, makes a basement suite possible, and improves everyday convenience for families. It is also one of the more technically complex renovation projects because the drainage challenge is genuinely different from upper-floor bathroom work.
This guide covers what the rough-in process involves for a basement bathroom addition, what the drainage options are, and what to expect in terms of cost and timeline.
Why Basement Plumbing Is Different
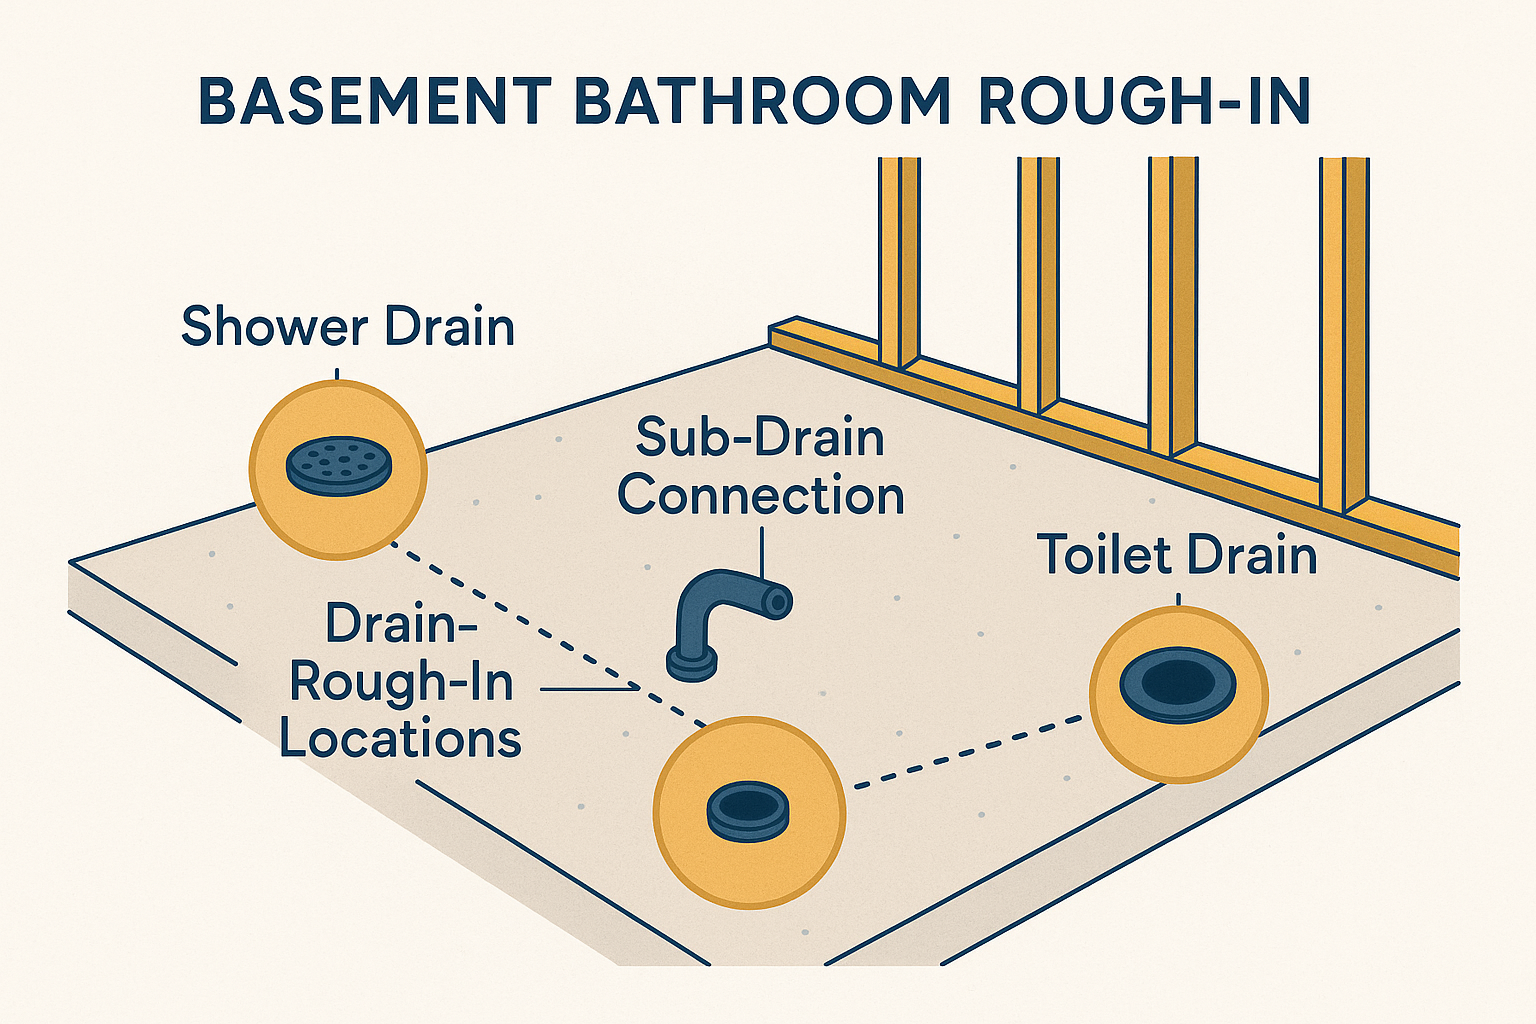
The central challenge in a basement bathroom is drainage. Your home’s main drain line runs through the basement floor and exits to the municipal sewer or septic system. Most basement floors sit at or slightly below the level of the main drain, which means any new drain connection for a toilet, shower, or sink must connect below the existing main drain level.
In an upper-floor bathroom, this is not a problem — all fixtures are well above the main drain, and gravity carries waste downhill to the stack. In a basement, achieving gravity drainage often requires breaking the concrete floor to install the drain connection below slab.
The two drainage approaches for basement bathrooms:
Option 1: Below-Slab Gravity Drain (Breaking the Concrete)
Breaking the concrete floor allows installation of new drain lines below the slab that connect to the main building drain. Once new drain lines are in place, the concrete is patched and the floor finished normally. The resulting bathroom uses conventional gravity drainage with no pump.
This is the preferred approach for basement bathrooms that will see regular daily use — a basement suite bathroom, a bathroom for a teenager’s bedroom in the basement, or a household’s primary secondary bathroom. Gravity drainage is reliable, quiet, and requires no maintenance.
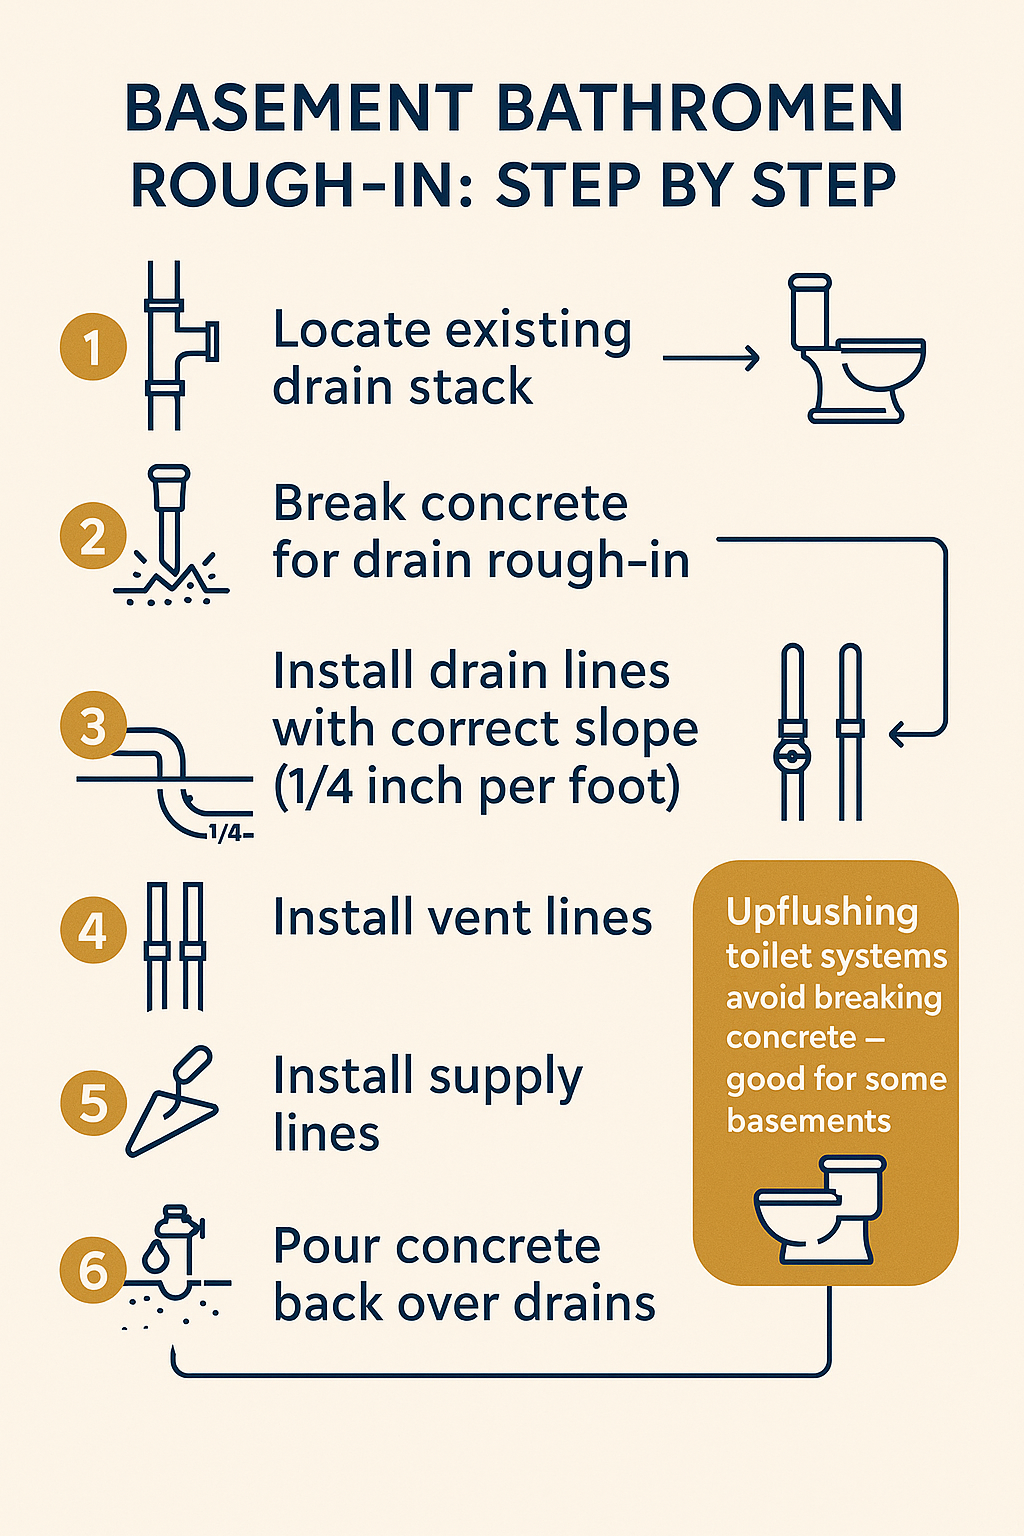
What the process involves:
1. Locate the existing main drain and its depth below the finished floor
2. Plan fixture locations relative to drain slope requirements
3. Mark and cut concrete at drain line locations (circular saw and jackhammer)
4. Excavate soil below the slab to install drain piping
5. Install drain lines at proper slope, connect to main drain
6. Install toilet flange, shower drain, and sink drain at the planned fixture locations
7. Backfill with gravel, pour new concrete patch
Cost: $3,000–$8,000 for the rough-in concrete work and drain installation, depending on the number of fixtures, soil conditions, and proximity to the main drain. This does not include bathroom finishes.
Option 2: Above-Floor Pump System (Upflush)
An upflush toilet system (macerating toilet) uses a pump to grind waste and pump it upward and horizontally to the existing drain stack above floor level. This eliminates the need to break concrete.
Well-known brands include Saniflo and Liberty Pumps. These systems handle toilet waste and, in more capable models, sink and shower drainage as well.
When to use upflush:
– The basement bathroom will be used occasionally (guest bathroom, home office)
– The budget does not support concrete cutting
– The soil or slab conditions make concrete cutting difficult or expensive
When not to use upflush:
– The bathroom will be used daily by multiple people (pump failure becomes a service event)
– The basement is being finished as a rental suite (pump maintenance is a landlord responsibility)
– Long-term reliability is the priority
Cost: A Saniflo or equivalent system costs $800–$1,500 for the unit. Installation adds $400–$800 in labour. Total installed: $1,200–$2,300.
The ongoing cost is pump maintenance every 5–8 years and eventual pump replacement after 10–15 years.
Supply Rough-In
Water supply for a basement bathroom is typically simpler than the drain challenge. Cold and hot supply lines run from the main service lines and water heater — both of which are usually in the basement mechanical room — to the fixture locations.
In most cases, supply lines can be run through unfinished spaces without structural work. PEX tubing is particularly well-suited to basement supply work because it can be routed easily through joists and around obstacles.
Hot water supply time: One consideration in a basement bathroom is the distance from the water heater to the fixtures. If the water heater is on the far end of the basement from the bathroom, hot water may take 30–60 seconds to arrive at the fixture as the cold water in the supply line clears. A return loop or point-of-use electric water heater at the fixture can address this if it is a concern.
Vent Rough-In
Every drain fixture requires a vent. In a basement bathroom addition, venting options include:
Extending the existing vent stack: Running new vent pipe up through the floor to connect with the existing vent stack above. This requires penetrations through the floor structure.
Air Admittance Valve (AAV): A mechanical vent that allows air into the drain system without requiring a dedicated vent pipe to the roof. Ontario Building Code permits AAVs in accessible locations where they are not subject to freezing. An AAV is a practical venting solution for a basement fixture group where extending a vent stack would be disruptive.
What a Basement Bathroom Rough-In Includes
A complete rough-in for a basement bathroom addition covers:
– Toilet rough-in (75 mm drain, supply)
– Shower rough-in (50 mm drain, supply to valve, valve location)
– Sink rough-in (38 mm drain, supply)
– Venting for all fixtures
– Inspection by City of Ottawa plumbing inspector
The rough-in is completed before any framing, drywall, or tile work begins. After rough-in inspection and approval, the bathroom is framed, drywalled, and tiled.
For our complete basement bathroom renovation service in Ottawa, we handle the full process from rough-in through finishing. For general bathroom renovation services, visit our main bathroom renovation page.
For technical guidance on below-slab drainage and basement plumbing, the Ontario Building Code governs all plumbing installation requirements. Saniflo provides detailed technical documentation for upflush toilet systems used in Canadian residential applications.
Frequently Asked Questions
Do you always have to break concrete to add a basement bathroom?
Not always. An upflush (macerating) toilet system can be installed without breaking concrete by pumping waste up to the existing drain stack above floor level. However, for a basement bathroom that will see daily regular use, breaking the concrete for a gravity drain system is the more reliable long-term approach.
How deep is the basement drain below the floor?
In Ottawa homes with basements, the main drain typically runs 30–60 cm below the basement floor. The exact depth depends on the age of the home and the slope needed to reach the municipal connection. A plumber can probe or expose the main drain to confirm its depth before planning the bathroom location.
What is the minimum basement bathroom footprint?
A three-piece basement bathroom (toilet, sink, shower) can be fitted in approximately 3 m x 2 m (6 square metres). A two-piece powder room (toilet and sink) can work in as little as 1.4 m x 1.8 m. The minimum dimensions are driven by plumbing clearances and door swing requirements under the Ontario Building Code.
Does a basement bathroom addition require a permit?
Yes. Any basement bathroom addition in Ottawa involves new plumbing, and plumbing that requires a permit — specifically new drain connections to the building drain, new vent connections, and new electrical for lighting and GFCI outlets. Building permits are required for any structural framing. Starting work without permits creates compliance issues and title complications at resale.