How to Re-Grout a Shower: A Step-by-Step DIY Guide
Re-grouting a shower is a demanding but achievable DIY project for a patient homeowner with the right tools. It addresses cracked, crumbling, or deeply stained grout that cannot be cleaned to a satisfactory condition. Done correctly, new grout restores the appearance of the shower, seals the tile joints, and extends the life of the installation. Done incorrectly — particularly if the waterproofing is not restored at caulked joints — it can give the appearance of repair while concealing ongoing water infiltration.
This guide covers when re-grouting is the right repair, what materials and tools are needed, and the step-by-step process.
When to Re-Grout vs. When to Call a Professional
Re-grouting is appropriate when:
– Grout is cracked but tiles are sound and firmly bonded
– Grout has deteriorated (crumbling, sandy texture) from age or chemical damage
– Grout is permanently stained and does not respond to cleaning
– Minor sections of grout are missing but the tile and substrate are intact
Call a professional when:
– Tiles are loose, hollow-sounding when tapped, or have shifted position
– Water has been leaking behind the tile (loose tiles, soft substrate, damp wall exterior)
– The shower pan slopes incorrectly or has standing water after use
– Grout failure is localized to the caulk joints (this is a re-caulking issue, not a re-grouting issue)
Re-grouting addresses the grout joints between tiles. If water has reached the substrate, the substrate may be damaged and simply re-grouting will not restore a watertight shower — the tile must come down, the substrate must be replaced, and the shower must be rebuilt with proper waterproofing.
Tools and Materials
Tools:
– Oscillating multi-tool with a grout removal blade (the fastest and most controlled method)
– Or: manual grout saw (a tungsten carbide blade saw for hand-cutting grout)
– Vacuum (shop vac preferred)
– Grout float
– Grout sponge (large-cell, for wiping)
– Margin trowel or mixing paddle
– Spray bottle with water
– Painter’s tape
Materials:
– Grout — matching the existing type (sanded grout for joints 3 mm or wider; unsanded for narrower joints) and colour
– Grout sealer (for cement grout)
– Silicone bathroom caulk (matching grout colour) for all caulk joints (inside corners, floor-to-wall transitions, tub rim)
– Tile cleaner for pre-cleaning
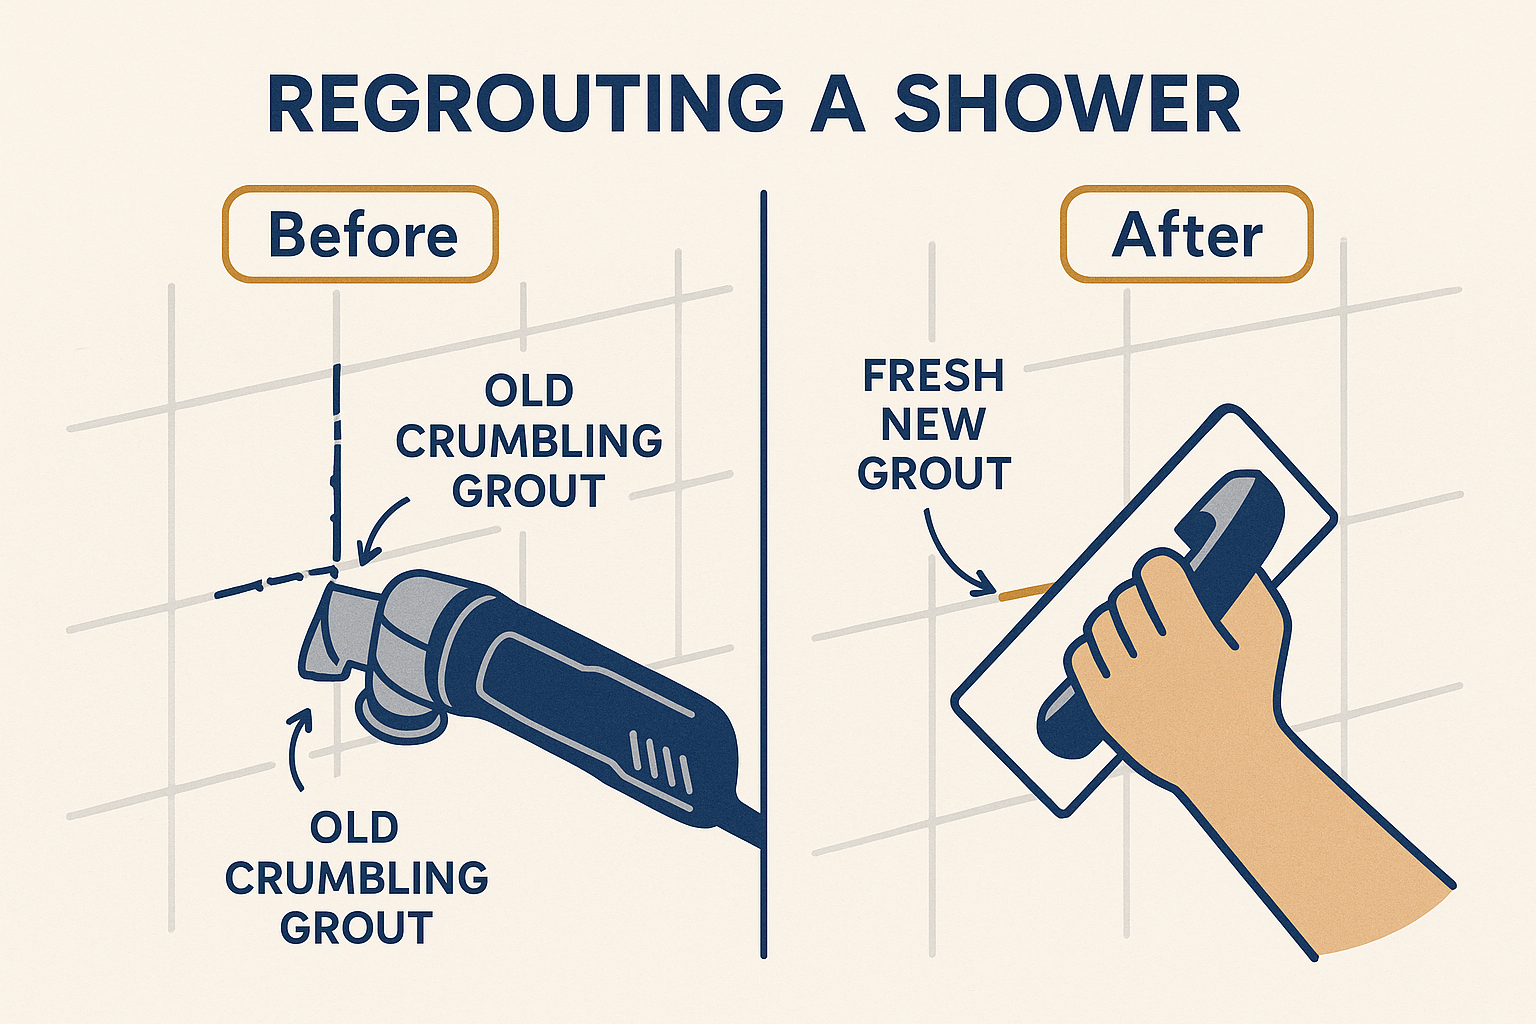
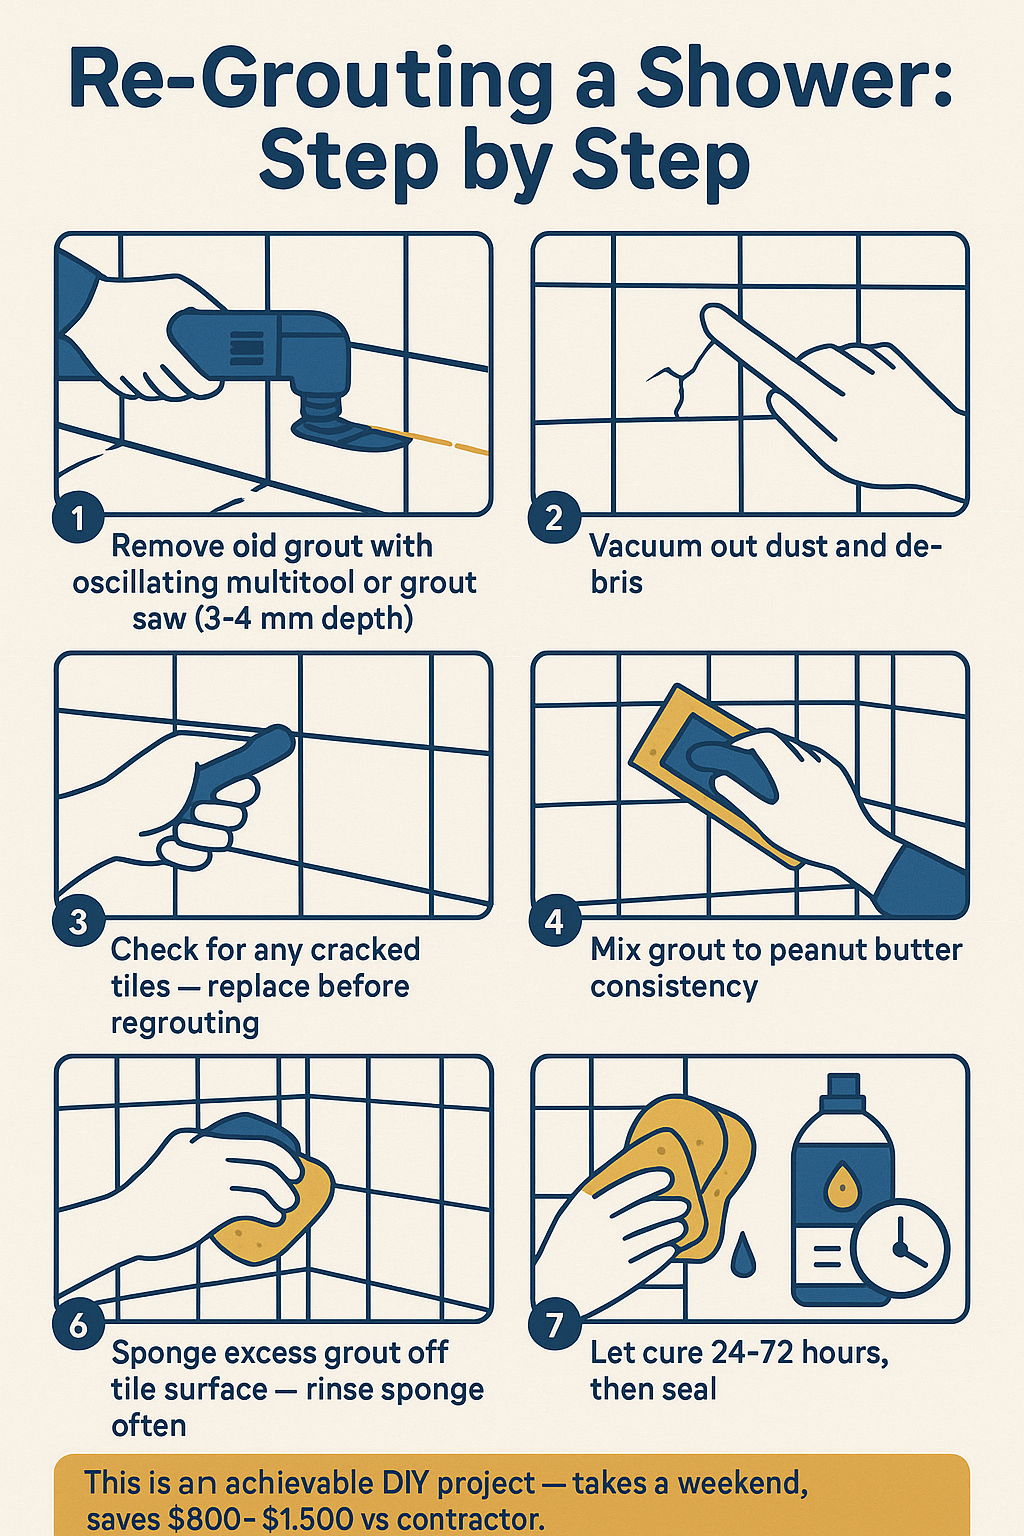
Step 1: Remove the Existing Grout
This is the most time-consuming step. The goal is to remove grout to a depth of 2–3 mm (approximately the top half to two-thirds of the grout joint depth) without damaging the tile edges.
Oscillating multi-tool method (recommended):
An oscillating tool with a grout removal or carbide-grit blade removes grout efficiently. The blade oscillates at high frequency and cuts through grout without the rotational force that can chip tile edges. Use a narrow blade matched to the grout joint width.
Work slowly and keep the blade in the center of the grout joint. The tool can damage tile edges if the blade wanders — patience and controlled movement matter more than speed.
Manual grout saw:
A grout saw is slower than the oscillating tool but provides more tactile control. It works well for smaller areas or for homeowners not comfortable with power tools near tile. Scored repeatedly along the grout joint, the carbide-grit blade removes grout in passes.
After removal:
Vacuum all grout dust from the joints before new grout is applied. Grout dust left in joints prevents new grout from bonding properly. Use compressed air to clear the joint interiors, then vacuum again.
Step 2: Clean the Surface
Before applying new grout, clean the tile surface of any residual grout dust, soap scum, or cleaning product residue. A commercial tile cleaner applied and rinsed off, followed by a clear water rinse, prepares the surface. Allow the surface to dry for at least 24 hours before applying new grout.
Step 3: Protect Caulk Zones with Tape
Identify all inside corners, floor-to-wall transitions, and the tub rim joint — these are caulk joints, not grout joints. Apply painter’s tape over these areas before grouting to prevent getting new grout into joints that should be caulked.
These joints are left open after grouting and filled with silicone caulk after the new grout has cured.
Step 4: Mix and Apply the Grout
Mix the grout: Follow the manufacturer’s instructions for water ratio. Grout mixed too wet shrinks and cracks; mixed too dry is difficult to work and does not fill joints completely. The correct consistency is similar to thick peanut butter — holds its shape but is workable.
Allow the grout to slake — rest after initial mixing — for the time specified on the package (typically 5–10 minutes). Mix briefly again before application.
Apply the grout with a float:
– Load the float with grout
– Hold the float at 45° to the tile surface
– Press grout into joints using diagonal strokes — working the float at 45° to the joint direction packs grout into the joint more effectively than working parallel to the joint
– Work in sections of approximately 1 m² at a time before cleaning
– Pack all joints firmly and completely — voids in grout joints allow water ingress
Step 5: Clean the Tile Face
After filling the joints in a section, clean the grout from the tile face before it hardens. Timing matters — too early and the grout pulls out of the joints; too late and it is difficult to remove without scratching.
Initial wipe (after 10–20 minutes):
Using a damp (not wet) grout sponge, wipe the tile surface in circular motions, rinsing the sponge frequently. The goal is to remove excess grout from the tile face while leaving the joints full.
Final wipe:
After the grout has partially set (30–60 minutes), a light haze remains on the tile surface. Buff this haze off with a clean dry cloth. Do not use a wet sponge at this stage — it re-wets the grout surface and can pull material from the joints.
Step 6: Cure and Seal
Allow the new grout to cure for the time specified on the manufacturer’s packaging — typically 24–72 hours before sealing and 72 hours before water exposure. Do not use the shower during this cure period.
Seal the grout: Apply a penetrating grout sealer to all cement grout joints once cured. The sealer slows moisture absorption and staining. Wipe excess sealer from tile surfaces within the specified time.
Step 7: Apply Silicone Caulk at Joints
Remove the painter’s tape from inside corners and change-of-plane joints. Apply 100% silicone bathroom caulk (matching the grout colour) to all these joints — inside shower corners, floor-to-wall transitions, and the tub rim if applicable. Tool and cure as described in the caulking article.
For bathroom renovations that go beyond re-grouting — where tile repair, waterproofing, or full shower replacement is needed — our team at Miracle Dream Homes handles the full scope in Ottawa. See also our bathroom renovation page for complete renovation services.
For grout product specifications and application guidance, the Tile Council of North America (TCNA) Handbook provides the industry installation standards for grout application in residential and commercial tile work.
Frequently Asked Questions
How do I know which type of grout to use when re-grouting?
Use the same grout type as the existing installation: sanded grout for joints 3 mm (⅛ inch) or wider; unsanded grout for joints narrower than 3 mm. If you are not sure what is existing, measure the joint width. Using sanded grout in narrow joints can scratch and damage polished tile surfaces; using unsanded grout in wide joints produces a weak, shrinkage-prone result.
Can I grout over existing grout without removing it?
Applying new grout over existing grout is not recommended and does not produce a lasting result. New grout applied over old grout bonds to the grout surface rather than the joint walls — it pops off within months. Removing the existing grout (to a depth of 2–3 mm minimum) provides the joint wall adhesion surface that new grout needs to bond correctly.
How long does re-grouted shower grout last?
Re-grouting with quality unsanded or sanded cement grout, properly mixed and applied, sealed after curing, and maintained with annual resealing, lasts 10–20 years or more before needing replacement again. The lifespan depends on the application quality, the moisture load of the shower, and the maintenance routine. Epoxy grout lasts indefinitely without sealing and is worth the additional cost and application difficulty in a high-use shower.
Do I need to re-tile if I want to change the grout colour?
No. Re-grouting replaces the grout without touching the tile. You can select a new grout colour when re-grouting — matching the existing, lightening it, or darkening it. The new colour should coordinate with the tile. Be aware that grout colour changes the visual pattern of the tile surface — a darker grout emphasizes the grid pattern; lighter grout makes it recede.